User Guide
UniNurse is a desktop app tailored for you, a private duty nurse, to:
- Manage your patients’ contact details.
- Organize your patient-related tasks.
- Keep track of your patients’ medical conditions.
Fastest fingers first!
If your fingers are as quick as your wit, UniNurse helps you to get your patient management tasks done in no time! It leverages a no-frills Command Line Interface (CLI) to give fast typists such as yourself a painless user experience.
UniNurse offers the following features:
- Add and edit patient details such as name, contact number, medical conditions, etc.
- Find and filter patients by their details.
- Add tasks to a patient.
- Show the tasks to be done on a specific day.
- Categorize patients using tags.
Using this guide
This guide walks you through all the features of UniNurse, as well as tips, so you can reap all the benefits of UniNurse!
If you are a new user, this guide equips you with the necessary know-how to get started with UniNurse.
If you are an experienced user, you can refer to the Command Summary at the end of this guide.
Here are some symbols used throughout this user guide:
| Symbol | Meaning |
|---|---|
| Important things you should take note of | |
| Useful information | |
| Warning |
Table of Contents
- Using this guide
- Table of Contents
- Quick start
- Glossary
- Command format
- Patient parameter constraints
-
Features
- Getting help:
help - Modifying patient contact details
- Modifying tags
- Modifying tasks
- Modifying medical conditions
- Modifying medications
- Modifying remarks
- Viewing patients
- Viewing tasks
- Undoing previous command:
undo - Reversing undo command:
redo - Clearing all entries:
clear - Exiting UniNurse:
exit - Saving the data
- Editing the data file
- Getting help:
- FAQ
- Command summary
Quick start
- Ensure you have Java 11 or above installed on your computer. To check your Java version, open a Command Prompt or Terminal window and type:
java -version
- Download the latest
uninurse.jarhere. - Move
uninurse.jarto the folder you want to use as the home folder for UniNurse. - Double-click the file to start UniNurse. A user interface similar to the one below should appear in a few seconds.
![]() Tip:
Tip:
The app comes with some sample patients by default. Type clear in the command box to remove them.

- Type your command in the command box and hit
Enterto execute the command. Here are some example commands you can try:-
help: Opens the help window. -
addn/Jane Doe p/91234567 e/janed@example.com a/20 Anderson Road, block 123, #01-01: Adds a patient namedJane Doeto your patient list. -
delete-p 3: Deletes the 3rd patient shown in the current list. -
list: Lists all patients. -
clear: Deletes all patients shown in the current list. -
exit: Exits from UniNurse.
-
- Refer to the Features below for details of each command. Alternatively, you may refer to the Command Summary at the end of this guide.
Glossary
Here are some of the technical terminologies used:
| Word | Meaning |
|---|---|
| Command | A sentence which the user inputs to perform a function. |
| Command word | The first word of every command. |
| Option | Part of the user input specifying the options for a command, which is preceded by a flag. |
| Flag | Part of the user input that allows the user to specify the specific options for a command, consisting of a letter preceded by a hyphen. Type of flags: -p, -t, -d, -c, -m, -r. |
| Parameter | Part of the user input consisting of information supplied by the user to UniNurse, which is preceded by a prefix. |
| Prefix | Part of the user input that allows the user to specify information for a patient, consisting of a letter preceded by a hyphen. Type of prefixes: n/, p/, e/, a/, t/, d/, c/, m/, r/. |
| Single-valued attribute | A patient’s detail that consists of a single value. A patient’s single-valued attributes are also called the patient’s contact details. Single-valued attributes: NAME, PHONE, EMAIL, ADDRESS. |
| Multi-valued attribute | A patient’s detail that consists of a list of values. Multi-valued attributes: TAG, TASK, CONDITION, MEDICATION, REMARK. |
Command format
![]() Notes about the command format:
Notes about the command format:
-
Words in
UPPER_CASEare the parameters to be supplied by the user.
e.g. inadd n/NAME,NAMEis a parameter which can be used asadd n/John Doe. -
All flags and options must be specified before any prefix or parameter.
-
Flags can be in any order.
e.g. if the command specifies-p PATIENT_INDEX -t TASK_INDEX,-t TASK_INDEX -p PATIENT_INDEXis also acceptable. -
There must be a space separating a flag and an option.
-
All indices must be a positive integer 1, 2, 3, …
-
PATIENT_INDEXrefers to the index number shown in the displayed patient list. -
Indices for patient attributes (e.g.
TASK_INDEX,CONDITION_INDEX,TAG_INDEX, etc.) refer to the index number shown in the attribute list of a patient.
e.g.TASK_INDEXrefers to the index number shown in the task list of a patient. -
The
|character is used as a parameter separator in an attribute. e.g. inm/MEDICATION_TYPE | DOSAGE, the|character is used to separateMEDICATION_TYPEandDOSAGE. -
Parameters in square brackets and angle brackets are optional.
e.g.n/NAME [t/TAG]can be used asn/John Doe t/friendor asn/John Doe. e.g.d/TASK_DESCRIPTION | <DATE TIME> | <INTERVAL TIME_PERIOD>can be used asd/task 1ord/task 1 | 22-3-22 1800. -
Parameters with
…after them can be used multiple times, including zero times.
e.g.[t/TAG]…can be used ast/friend,t/friend t/familyetc. -
Parameters can be in any order.
e.g. if the command specifiesn/NAME p/PHONE_NUMBER,p/PHONE_NUMBER n/NAMEis also acceptable. -
If a parameter is expected only once in the command but you specified it multiple times, only the last occurrence of the parameter will be taken.
e.g. if you specifyp/12341234 p/56785678, onlyp/56785678will be taken. -
Extraneous parameters for commands that do not take in parameters (such as
help,list,exit, andclear) will be ignored.
e.g. if the command specifieshelp 123, it will be interpreted ashelp.
Patient parameter constraints
A patient’s attributes can be categorized into two: single-valued attributes and multi-valued attributes. A patient’s single-valued attributes consist of their name, phone, email, and address, and their multi-valued attributes consist of their tags, tasks, conditions, medications, and remarks.
Single-valued attributes
A patient’s single-valued attributes are also referred to as the patient’s contact details, which consist of the following.
n/NAME
NAME should only contain alphanumeric characters and spaces.
NAME is specified by the prefix n/.
Example: n/John Doe
p/PHONE
PHONE should only contain numbers, and it should be at least 3 digits long.
PHONE is specified by the prefix p/.
Example: p/91234567
e/EMAIL
EMAIL should be in the form of local-part@domain, where:
-
local-partcontains only alphanumeric characters and the special characters+,_,.,-, and may not start or end with any special characters. -
domainis made up of domain labels separated by periods, wheredomainmust:- end with a domain label at least 2 characters long.
- have each domain label start and end with alphanumeric characters.
- have each domain label consist of alphanumeric characters, separated only by hyphens, if any.
EMAIL is specified by the prefix e/.
Example: johndoe@gmail.com
a/ADDRESS
ADDRESS accepts any values, excluding prefixes.
ADDRESS is specified by the prefix a/.
Example:a/John street, block 123, #01-01
Multi-valued attributes
t/TAG
TAG accepts any values, excluding prefixes.
TAG is specified by the prefix t/, and its index by the flag -t.
Example:t/12-A nursing home
d/TASK_DESCRIPTION | DATE TIME | INTERVAL TIME_PERIOD
The task parameter has the following constraints:
-
TASK_DESCRIPTIONaccepts any values, excluding prefixes and|separators. -
DATE TIMEshould be in the format ofDD-MM-YYorDD-MM-YY HHMM.
e.g.2-7-22 1345,09-4-22,08-06-22 0900,7-06-22 2130and28-10-22are all validDATE TIME. -
INTERVAL TIME_PERIODshould be in the format ofX day(s)/week(s)/month(s)/year(s)whereXis a positive integer.
TASK is specified by the prefix d/, and its index by the flag -d.
Example: d/Take CT scan | 23-11-22 1530 | 2 months
c/CONDITION
CONDITION accepts any values, excluding prefixes.
CONDITION is specified by the prefix c/, and its index by the flag -c.
Example:c/Parkinson's disease
m/MEDICATION_TYPE | DOSAGE
MEDICATION_TYPE accepts any values, excluding prefixes and | separators.
DOSAGE should only contain alphanumeric characters, decimal points, and spaces.
MEDICATION is specified by the prefix m/, and its index by the flag -m.
Example:m/Amoxicillin | 0.5g every 8 hours
r/REMARK
REMARK accepts any values, excluding prefixes.
REMARK is specified by the prefix r/, and its index by the flag -r.
Example:r/Allergic to peanuts
Patient parameter summary
| Parameter | Type | Flag | Prefix |
|---|---|---|---|
NAME |
Single-valued attribute | - | n/ |
PHONE |
Single-valued attribute | - | p/ |
EMAIL |
Single-valued attribute | - | e/ |
ADDRESS |
Single-valued attribute | - | a/ |
TAG |
Multi-valued attribute | -t |
t/ |
TASK |
Multi-valued attribute | -d |
d/ |
CONDITION |
Multi-valued attribute | -c |
c/ |
MEDICATION |
Multi-valued attribute | -m |
m/ |
REMARK |
Multi-valued attribute | -r |
r/ |
PATIENT |
- | -p |
- |
![]() Notes:
Notes:
- The value of an attribute is prefixed by its prefix.
- The index of a patient’s multi-valued attribute is specified with its flag.
- The flag and the prefix of a multi-valued attribute are coded with the same letter.
- The patient index flag
-pis an exception, as it has no corresponding prefix.
Features
![]() Tip:
Tip:
You can navigate through your command history by using the ↑ and ↓ arrow keys.
- Two or more consecutive identical commands are saved once.
- Only successful commands are saved in the command history.
- The command history saves up to 100 previous commands.
Getting help: help
You can access the help page with the help command.
Format: help

help command
Adding a patient: add
You can add a patient to the patient list with the add command.
Format: add n/NAME p/PHONE e/EMAIL a/ADDRESS [t/TAG]… [d/TASK_DESCRIPTION | <DATE TIME> | <INTERVAL TIME_PERIOD>]… [c/CONDITION]… [m/MEDICATION | DOSAGE]… [r/REMARK]…
![]() Tip:
Tip:
You can view the constraints for each parameter in the Patient parameter constraints section.
![]() Notes:
Notes:
- You cannot add duplicate patients.
- Patients are considered duplicates only when they have the same
NAME,PHONE,EMAIL, andADDRESS. - Patients’ details are case-sensitive e.g.
Johnis distinct fromjohn.
![]() Tip:
Tip:
You can add any number of tags, tasks, medical conditions, medications, and remarks to a patient.
Examples:
-
add n/John Doe p/98765432 e/johnd@example.com a/John street, block 123, #01-01 d/Administer 3ml of example medicine | 16-10-22 t/severe t/elderlyadds a patient with the following details:- Name:
John Doe - Phone number:
98765432 - Email:
johnd@example.com - Address:
John street, block 123, #01-01 - Tasks:
Administer 3ml of example medicine | 16-10-22 - Tags:
elderly,severe
- Name:
-
add n/Betsy Crowe c/Dementia c/High blood pressure e/betsy@example.com a/Jane street blk 420 #01-69 p/87901234adds a patient with the following details:- Name:
Betsy Crowe - Phone number:
87901234 - Email:
betsy@example.com - Address:
Jane street blk 420 #01-69 - Medical conditions:
Dementia,High blood pressure
- Name:
Editing a patient’s contact details: edit -p
You can edit the contact details of an existing patient in the patient list with the edit command.
Format: edit -p PATIENT_INDEX [n/NAME] [p/PHONE] [e/EMAIL] [a/ADDRESS]
![]() Tip:
Tip:
You can view the constraints for each parameter in the Patient parameter constraints section.
![]() Notes:
Notes:
- You cannot edit tags, tasks, medical conditions, medications, and remarks with this command.
- If there are duplicate patients after editing a patient, it will not be edited.
![]() Tip:
Tip:
You can refer to the Table of contents to find the section with the parameter you want to edit.
Example:
-
edit -p 1 p/91234567 e/johndoe@example.comedits the phone number and email address of the 1st patient to be91234567andjohndoe@example.comrespectively.
Deleting a patient: delete -p
You can delete a patient from the patient list with the delete command.
Format: delete -p PATIENT_INDEX
Examples:
-
listfollowed bydelete -p 2deletes the 2nd patient in the patient list. -
find Betsyfollowed bydelete -p 1deletes the 1st patient in the results of thefindcommand.
![]() Tip:
Tip:
You can use the undo command to undo an accidental delete command.
Adding a tag: add -p
You can add a tag to a patient with the add command.
Format: add -p PATIENT_INDEX t/TAG
![]() Notes:
Notes:
- You can only add one tag at a time.
- You cannot add duplicate tags.
- Tags are case-sensitive e.g.
high-riskis distinct fromHigh-risk. - Tags are always sorted in lexicographical order.
Examples:
-
listfollowed byadd -p 1 t/high-riskadds thehigh-risktag to the 1st patient in the patient list. -
find Betsyfollowed byadd -p 2 t/high-riskadds thehigh-risktag to the 2nd patient in the results of thefind Betsycommand.
![]() Tip:
Tip:
You can add multiple tags at once when you first add a patient.
![]() Tip:
Tip:
You can understand the commands about multi-valued attributes as follows.
Adding a value to an attribute: add -p
You can add a value to a patient’s attribute with the add command.
Format: add -p PATIENT_INDEX xyz/XYZ_VALUE
Example:
-
listfollowed byadd -p 1 t/high-riskadds thehigh-risktag (attributet) to the 1st patient in the patient list.
Editing a value of an attribute: edit -p -xyz
Format: edit -p PATIENT_INDEX -xyz XYZ_INDEX xyz/XYZ_VALUE
Example:
-
listfollowed byedit -p 2 -t 3 t/high-riskedits the 3rd tag (attributet) of the 2nd patient in the patient list tohigh-risk.
Deleting a value from an attribute: edit -p -xyz
Format: delete -p PATIENT_INDEX -xyz XYZ_INDEX
Example:
-
listfollowed bydelete -p 2 -t 3deletes the 3rd tag (attributet) of the 2nd patient in the patient list.
Editing a tag: edit -p -t
You can edit a tag of a patient with the edit command.
Format: edit -p PATIENT_INDEX -t TAG_INDEX t/TAG
![]() Notes:
Notes:
- You can only edit one tag at a time.
- If there are duplicate tags after editing a tag, it will not be edited.
Examples:
-
listfollowed byedit -p 2 -t 3 t/high-riskedits the 3rd tag of the 2nd patient in the patient list tohigh-risk. -
find Betsyfollowed byedit -p 1 -t 2 t/high-riskedits the 2nd tag of the 1st patient in the results of thefind Betsycommand tohigh-risk.
![]() Tip:
Tip:
You can refer to this tip to better understand the commands about muti-valued attributes.
Deleting a tag: delete -p -t
You can delete a tag of a patient with the delete command.
Format: delete -p PATIENT_INDEX -t TAG_INDEX
Examples:
-
listfollowed bydelete -p 2 -t 3deletes the 3rd tag of the 2nd patient in the patient list. -
find Betsyfollowed bydelete -p 1 -t 2deletes the 2nd tag of the 1st patient in the results of thefind Betsycommand.
![]() Tip:
Tip:
You can refer to this tip to better understand the commands about muti-valued attributes.
Adding a task: add -p
You can add a task or recurring task to a patient with the add command.
Format: add -p PATIENT_INDEX d/TASK_DESCRIPTION | <DATE TIME> | <INTERVAL TIME_PERIOD>
![]() Notes:
Notes:
-
DATE TIMEandINTERVAL TIME_PERIODmust follow the criteria defined in Task parameters. - If
DATE TIMEis omitted, the task will be created with a date and time 24 hours from the moment of creation. - If
DATEis specified butTIMEis omitted, the task will be created with a default time of0000hours. - If
INTERVAL TIME_PERIODis omitted, then the task created will be a non-recurring task, i.e. a one-off task. - Note that tasks are automatically sorted in chronological order upon being added.
e.g. if the patient already has tasks on24-10-22, and a new task on27-10-22is created, then the new task will be the 2nd task for the patient after the one on24-10-22. - If the day portion of the date exceeded the last day of that calendar month, but is between 1 and 31, it would default to the last day of the month.
e.g.31-4-22will be automatically converted to30-4-22, and30-2-20will be converted to29-2-20(since 2020 is a leap year). - Overdue recurring tasks will automatically add corresponding new recurring tasks based on their frequency.
- Tasks are considered duplicates only when
TASK_DESCRIPTION,DATE TIME, andINTERVAL TIME_PERIOD(if applicable) are the same e.g.Take X-rays | 23-4-22 1345is different fromTake X-rays | 23-4-22 1345 | 3 weeks. - Tasks are case-sensitive e.g.
Take X-raysis distinct fromTake x-rays.
![]() Caution:
Caution:
If you enter a TIME of 2400, then the date and time will be set to 0000 hours of the next day.
Examples:
-
listfollowed byadd -p 1 d/Administer 3ml of example medicineadds a task to the 1st patient in the patient list. -
find Betsyfollowed byadd -p 2 d/Change dressing on left arm | 12-7-22adds a task to the 2nd patient in the results of thefindcommand, on 12th July 2022 0000 hours. -
add -p 3 d/Take X-rays | 23-4-22 1345 | 3 weeksadds a recurring task to the 3rd patient for every 3 weeks starting from 23rd April 2022 1345 hours.
![]() Tip:
Tip:
You can add multiple tasks at once when you first add a patient.
![]() Tip:
Tip:
You can refer to this tip to better understand the commands about muti-valued attributes.
Editing a task: edit -p -d
You can edit a task of a patient with the edit command.
Format: edit -p PATIENT_INDEX -d TASK_INDEX d/<TASK_DESCRIPTION> | <DATE TIME> | <INTERVAL TIME_PERIOD>
![]() Notes:
Notes:
-
DATE TIMEandINTERVAL TIME_PERIODmust follow the criteria defined in Task parameters. - If a
INTERVAL TIME_PERIODis provided for what was originally a non-recurring task, the edit will transform it into a recurring one based on the given frequency - Tasks are automatically sorted in chronological order upon modification, i.e. if a task on
25-10-22is edited to be30-10-22, its newTASK INDEXwould be based on the displayed order in the patient’s task list. - If there are duplicate tasks after editing a task, it will not be edited.
- You cannot have a
|at the end or else a warning will be thrown.
Examples:
-
listfollowed byedit -p 1 -d 1 d/Administer 3ml of example medicineedits the description of the 1st task of the 1st patient in the patient list toAdminister 3ml of example medicine, while retaining the original date and time for the task. -
find Betsyfollowed byedit -p 2 -d 3 d/| 23-10-22 0800edits the date and time of the 3rd task of the 2nd patient in the results of thefindcommand to 23rd October 2022 0800 hours, while retaining the original description for the task. -
listfollowed byedit -p 1 -d 1 d/| | 3 daysedits the recurrence of the 1st task of the 1st patient if the task was a recurring task to every 3 days, while keeping the original description, date, and time. If the task was a non-recurring task, then this edit transforms the task into a recurring task with a recurrence of every 3 days. -
listfollowed byedit -p 2 -d 3 d/| 25-10-22 | 2 weeksedits the date and recurrence of the 3rd task for the 2nd patient in the patient list to 25th October 2022 and every 2 weeks, while keeping the original description and time. If the task was a non-recurring task, then this edit transforms the task into a recurring task with a recurrence of every 2 weeks. -
find Davidfollowed byedit -p 1 -d 2 d/Change bandage | | 4 daysedits the description and recurrence of the 2nd task of the 1st patient in the results offindcommand toChange bandageand every 4 days, while keeping the original date and time. If the task was a non-recurring task, then this edit transforms the task into a recurring task with a recurrence of every 4 days.
![]() Notes:
Notes:
You must always provide a DATE if you want to change the TIME.
e.g. to change from 25-10-22 0800 to 25-10-22 0900, the edit would be d/| 25-10-22 0900.
![]() Tip:
Tip:
You can refer to this tip to better understand the commands about muti-valued attributes.
Deleting a task: delete -p -d
You can delete a task of a patient with the delete command.
Format: delete -p PATIENT_INDEX -d TASK_INDEX
Examples:
-
listfollowed bydelete -p 2 -d 3deletes the 3rd task of the 2nd patient in the patient list. -
find Betsyfollowed bydelete -p 1 -d 2deletes the 2nd task of the 1st patient in the results of thefindcommand.
![]() Tip:
Tip:
You can refer to this tip to better understand the commands about muti-valued attributes.
Adding a medical condition: add -p
You can add a medical condition to a patient with the add command.
Format: add -p PATIENT_INDEX c/CONDITION
![]() Notes:
Notes:
- You can only add one medical condition at a time.
- You cannot add duplicate medical conditions.
- Medical conditions are case-sensitive e.g.
diabetesis distinct fromDiabetes.
Examples:
-
listfollowed byadd -p 1 c/Diabetesadds theDiabetescondition to the 1st patient in the patient list. -
find Betsyfollowed byadd -p 2 c/Alzheimer's diseaseadds theDiabetescondition to the 2nd patient in the results of thefind Betsycommand.
![]() Tip:
Tip:
You can add multiple medical conditions at once when you first add a patient.
![]() Tip:
Tip:
You can refer to this tip to better understand the commands about muti-valued attributes.
Editing a medical condition: edit -p -c
You can edit a medical condition of a patient with the edit command.
Format: edit -p PATIENT_INDEX -c CONDITION_INDEX c/CONDITION
![]() Notes:
Notes:
- You can only edit one medical condition at a time.
- If there are duplicate medical conditions after editing a medical condition, it will not be edited.
Examples:
-
listfollowed byedit -p 2 -c 3 c/Diabetesedits the 3rd condition of the 2nd patient in the patient list toDiabetes. -
find Betsyfollowed byedit -p 1 -c 2 c/Diabetesedits the 2nd condition of the 1st patient in the results of thefind Betsycommand toDiabetes.
![]() Tip:
Tip:
You can refer to this tip to better understand the commands about muti-valued attributes.
Deleting a medical condition: delete -p -c
You can delete a medical condition of a patient with the delete command.
Format: delete -p PATIENT_INDEX -c CONDITION_INDEX
Examples:
-
listfollowed bydelete -p 2 -c 3deletes the 3rd condition of the 2nd patient in the patient list. -
find Betsyfollowed bydelete -p 1 -c 2deletes the 2nd condition of the 1st patient in the results of thefind Betsycommand.
![]() Tip:
Tip:
You can refer to this tip to better understand the commands about muti-valued attributes.
Adding a medication: add -p
You can add a medication to a patient with the add command.
Format: add -p PATIENT_INDEX m/MEDICATION_TYPE | DOSAGE
![]() Notes:
Notes:
- You can only add one medication at a time.
- You cannot add duplicate medications.
- Medications are considered duplicates only when both
MEDICATION_TYPEandDOSAGEare the same e.g.Paracetamol | 1 tab every 6 hoursis different fromParacetamol | 2 tabs every 6 hours. - Medications are case-sensitive e.g.
Paracetamolis distinct fromparacetamol.
Examples:
-
listfollowed byadd -p 1 m/Paracetamol | 2 tabs every 6 hoursadds theParacetamolmedication with the dosage2 tabs every 6 hoursto the 1st patient in the patient list. -
find Alicefollowed byadd -p 2 m/Amoxicillin | 0.5g every 8 hoursadds theAmoxicillinmedication with the dosage0.5g every 8 hoursto the 2nd patient in the results of thefind Alicecommand.
![]() Tip:
Tip:
You can add multiple medications at once when you first add a patient.
![]() Tip:
Tip:
You can refer to this tip to better understand the commands about muti-valued attributes.
Editing a medication: edit -p -m
You can edit a medication of a patient with the edit command.
Format: edit -p PATIENT_INDEX -m MEDICATION_INDEX m/<MEDICATION_TYPE> | <DOSAGE>
![]() Notes:
Notes:
- You can only edit one medication at a time.
- If no new
MEDICATION_TYPEorDOSAGEare provided, then original values will be used. - At least one of
MEDICATION_TYPEorDOSAGEmust be present, or else the medication will not be edited. - If there are duplicate medications after editing a medication, it will not be edited.
- You cannot have a
|at the end or else a warning will be thrown.
Examples:
-
listfollowed byedit -p 1 -m 1 d/Amoxicillinedits the medication type of the 1st medication of the 1st patient in the patient list toAmoxicillin, while retaining the original dosage. -
find Alicefollowed byedit -p 2 -m 3 d/| 2 tabs every 6 hoursedits the dosage of the 3rd medication of the 2nd patient in the results of thefind Alicecommand, while retaining the original medication type.
![]() Tip:
Tip:
You can refer to this tip to better understand the commands about muti-valued attributes.
Deleting a medication: delete -p -m
You can delete a medication of a patient with the delete command.
Format: delete -p PATIENT_INDEX -m MEDICATION_INDEX
Examples:
-
listfollowed bydelete -p 2 -m 3deletes the 3rd medication of the 2nd patient in the patient list. -
find Alicefollowed bydelete -p 1 -m 2deletes the 2nd medication of the 1st patient in the results of thefind Alicecommand.
![]() Tip:
Tip:
You can refer to this tip to better understand the commands about muti-valued attributes.
Adding a remark: add -p
You can add a remark to a patient with the add command.
Format: add -p PATIENT_INDEX r/REMARK
![]() Notes:
Notes:
- You can only add one remark at a time.
- You cannot add duplicate remarks.
- Remarks are case-sensitive e.g.
allergic to peanutsis distinct fromAllergic to Peanuts.
Examples:
-
listfollowed byadd -p 1 r/Requires wheelchair to move aroundadds theRequires wheelchair to move aroundremark to the 1st patient in the patient list. -
find Rachelfollowed byadd -p 2 r/Allergic to Peanutsadds theAllergic to Peanutsremark to the 2nd patient in the results of thefind Rachelcommand.
![]() Tip:
Tip:
You can add multiple remarks at once when you first add a patient.
![]() Tip:
Tip:
You can refer to this tip to better understand the commands about muti-valued attributes.
Editing a remark: edit -p -r
You can edit a remark of a patient with the edit command.
Format: edit -p PATIENT_INDEX -r REMARK_INDEX r/REMARK
![]() Notes:
Notes:
- You can only edit one remark at a time.
- If there are duplicate remarks after editing a remark, it will not be edited.
Examples:
-
listfollowed byedit -p 2 -r 3 r/Allergic to Amoxicillinedits the 3rd remark of the 2nd patient in the patient list toAllergic to Amoxicillin. -
find Rachelfollowed byedit -p 1 -r 2 r/Allergic to Amoxicillinedits the 2nd remark of the 1st patient in the results of thefind Rachelcommand toAllergic to Amoxicillin.
![]() Tip:
Tip:
You can refer to this tip to better understand the commands about muti-valued attributes.
Deleting a remark: delete -p -r
You can delete a medical condition of a patient with the delete command.
Format: delete -p PATIENT_INDEX -r REMARK_INDEX
Examples:
-
listfollowed bydelete -p 2 -r 3deletes the 3rd remark of the 2nd patient in the patient list. -
find Rachelfollowed bydelete -p 1 -r 2deletes the 2nd remark of the 1st patient in the results of thefind Rachelcommand.
![]() Tip:
Tip:
You can refer to this tip to better understand the commands about muti-valued attributes.
Listing all patients: list
You can view a list of all patients using the list command.
Format: list
Viewing all details of a patient: focus -p
You can view all details of a specified patient using the focus command.
Format: focus -p PATIENT_INDEX
Examples:
-
listfollowed byfocus -p 2shows all details of the 2nd patient in the patient book. -
find Fionafollowed byfocus -p 1shows all details of the 1st patient in the results of thefindcommand.
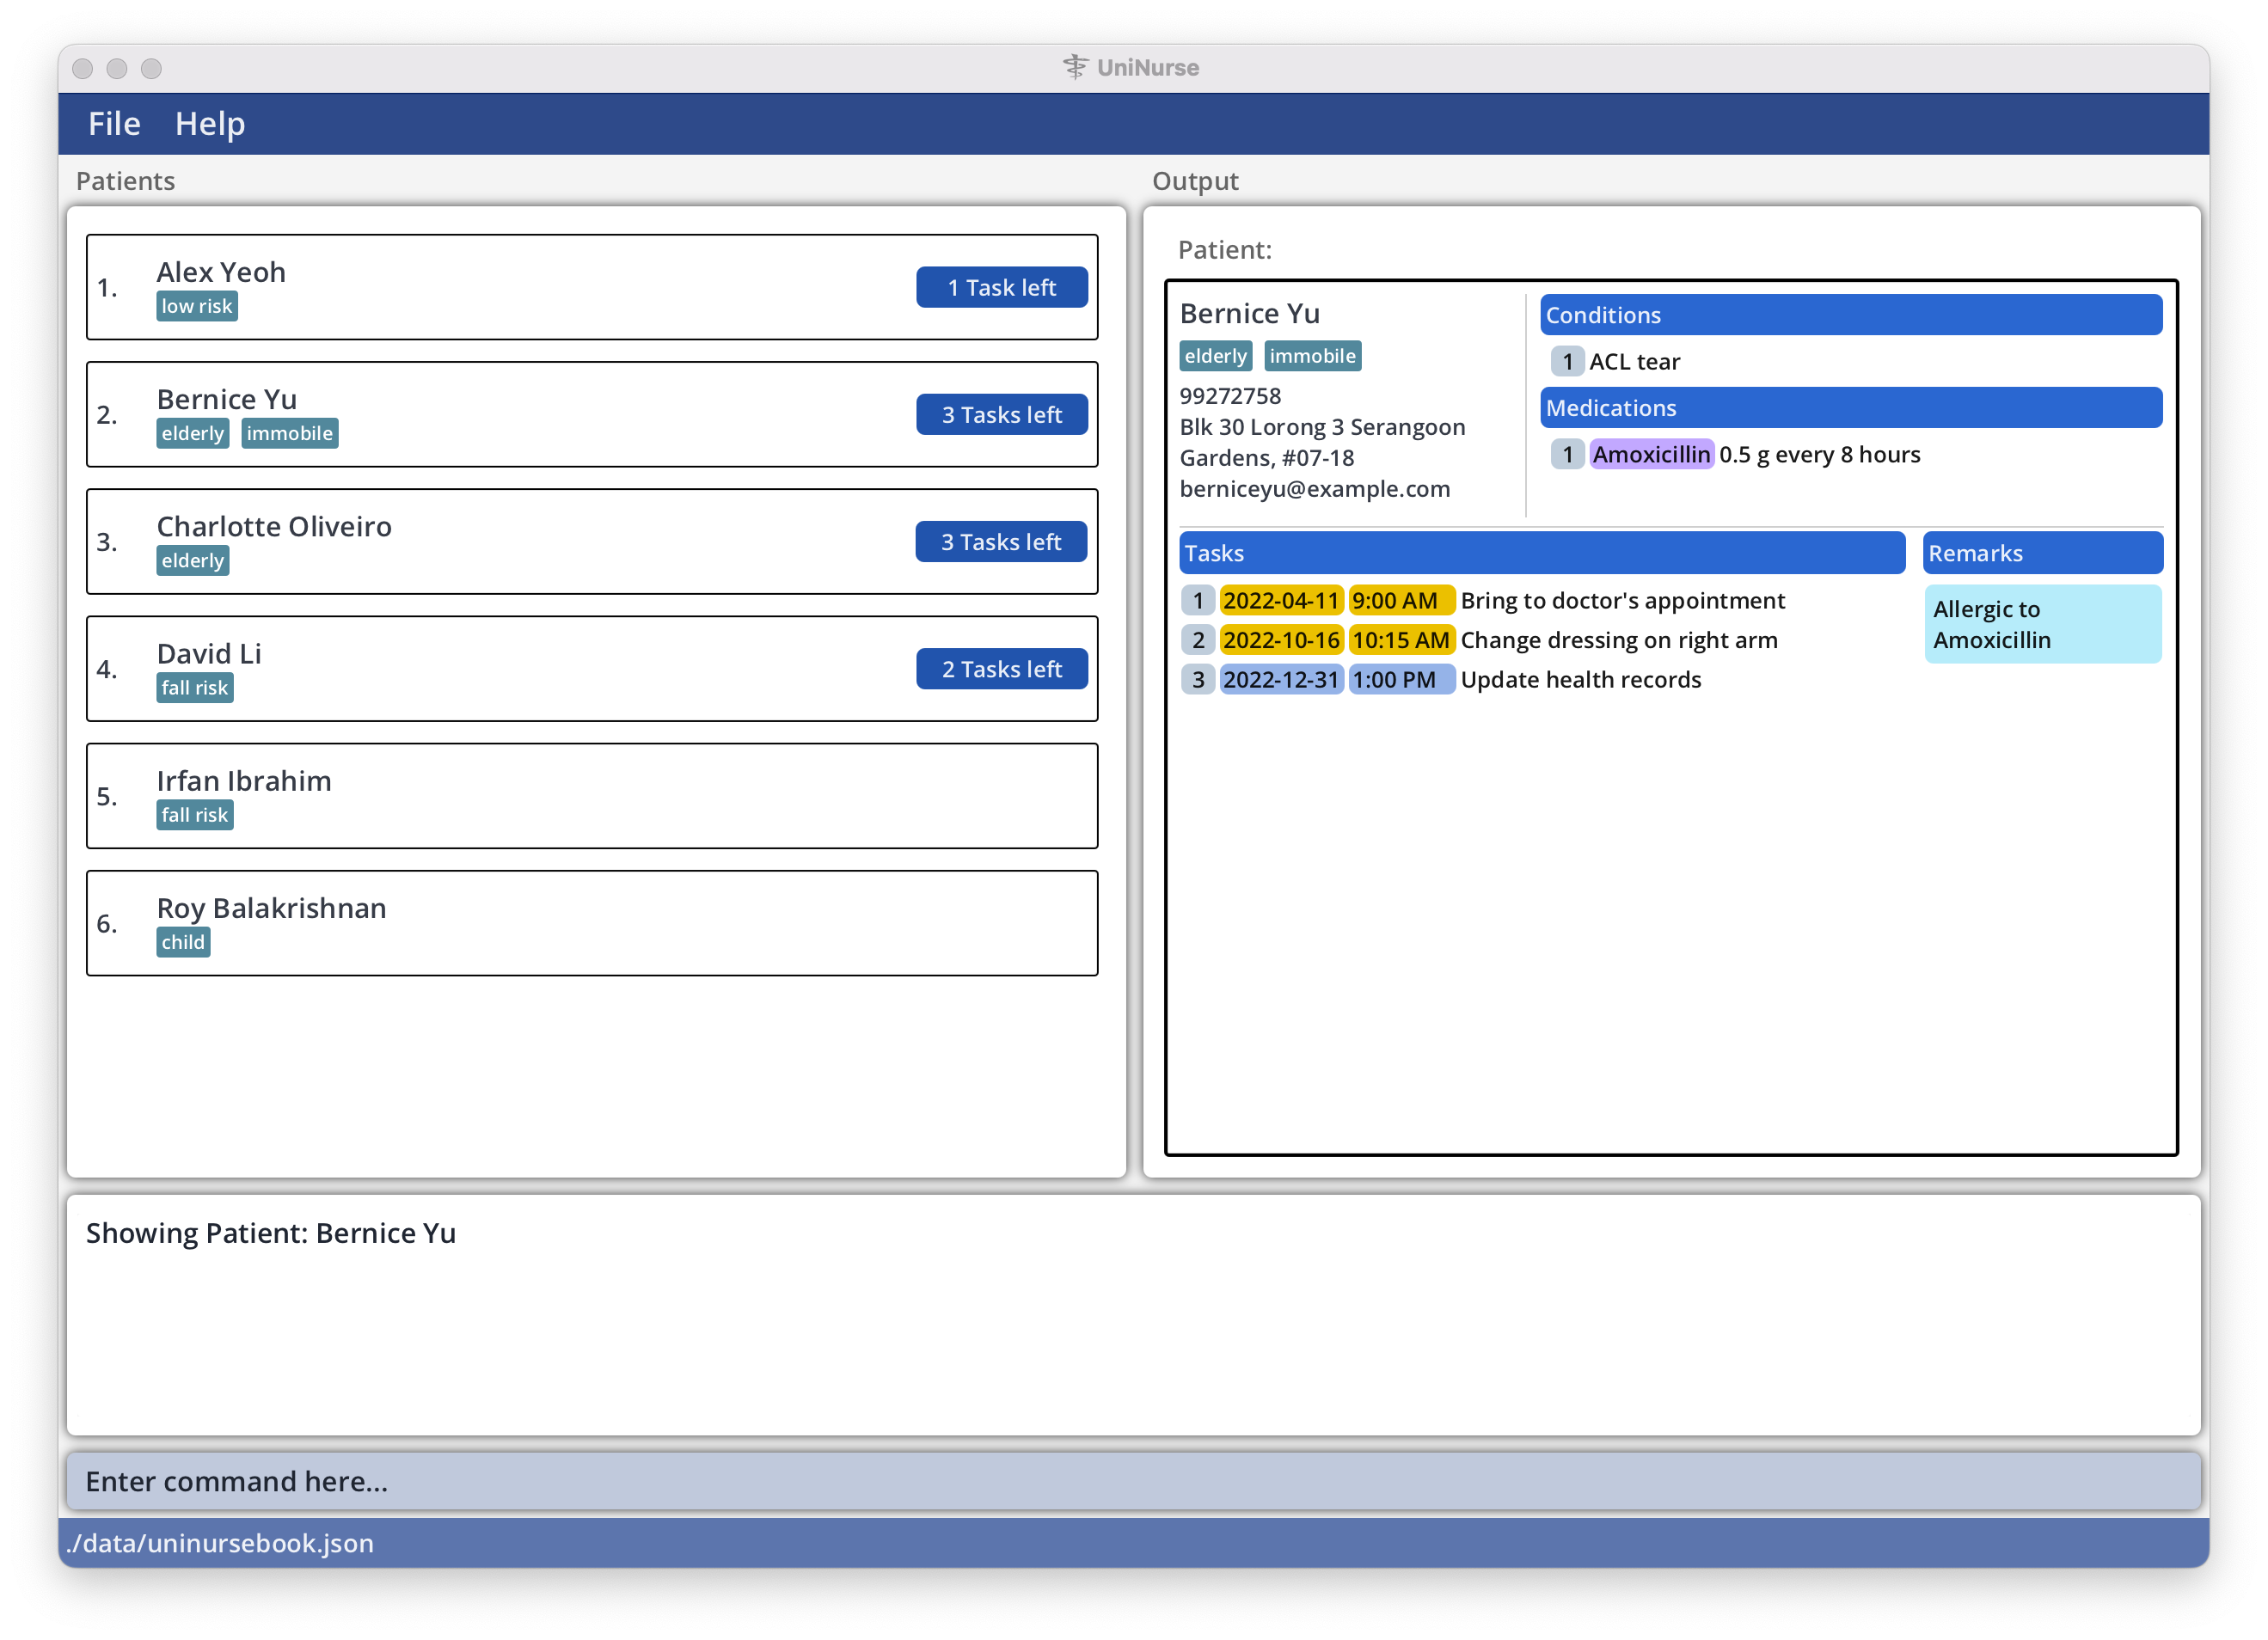
focus -p 2 command
Finding patients: find
You can find specific patients using the find command.
Format: find [KEYWORD]… [xyz/XYZ_KEYWORD]…
![]() Notes:
Notes:
-
xyz/XYZ_KEYWORDrefers to a keyword for a specific attribute with the prefixxyz. - There should be at least one parameter for the command.
- The search is case-insensitive. e.g.
hanswill matchHans. - The order of the keywords does not matter. e.g.
Hans Bowill matchBo Hans. - Partial words can be matched e.g.
Hanwill matchHans. - Patients matching at least one keyword in every attribute will be returned (i.e. AND search for different attributes, OR search for the same attribute). In more detail,
- At least one of the patient’s attributes (name, phone, email, address, tag, task description, condition, medication, or remark) must match with at least one
KEYWORD(unless it is empty). - For every different attribute with the prefix
xyz, it must match at least oneXYZ_KEYWORD(unless it is empty).
- At least one of the patient’s attributes (name, phone, email, address, tag, task description, condition, medication, or remark) must match with at least one
Examples:
-
find key n/John n/Betsy n/Charlie e/@example.com e/@u.nus.edudisplays all patients who fulfill all conditions below:- The patient’s name must contain either
JohnorBetsyorCharlie. - The patient’s email address must contain either
@example.comor@u.nus.edu. - At least one of the patient’s details must contain
key(e.g., one of their tags containskey).
- The patient’s name must contain either
-
find jodisplays patients with namesJoeandJohn, patients with emailsjo@example.com, and patients with tagjoints. -
find n/alice n/meierdisplays patientsAlice TanandBenson Meier.
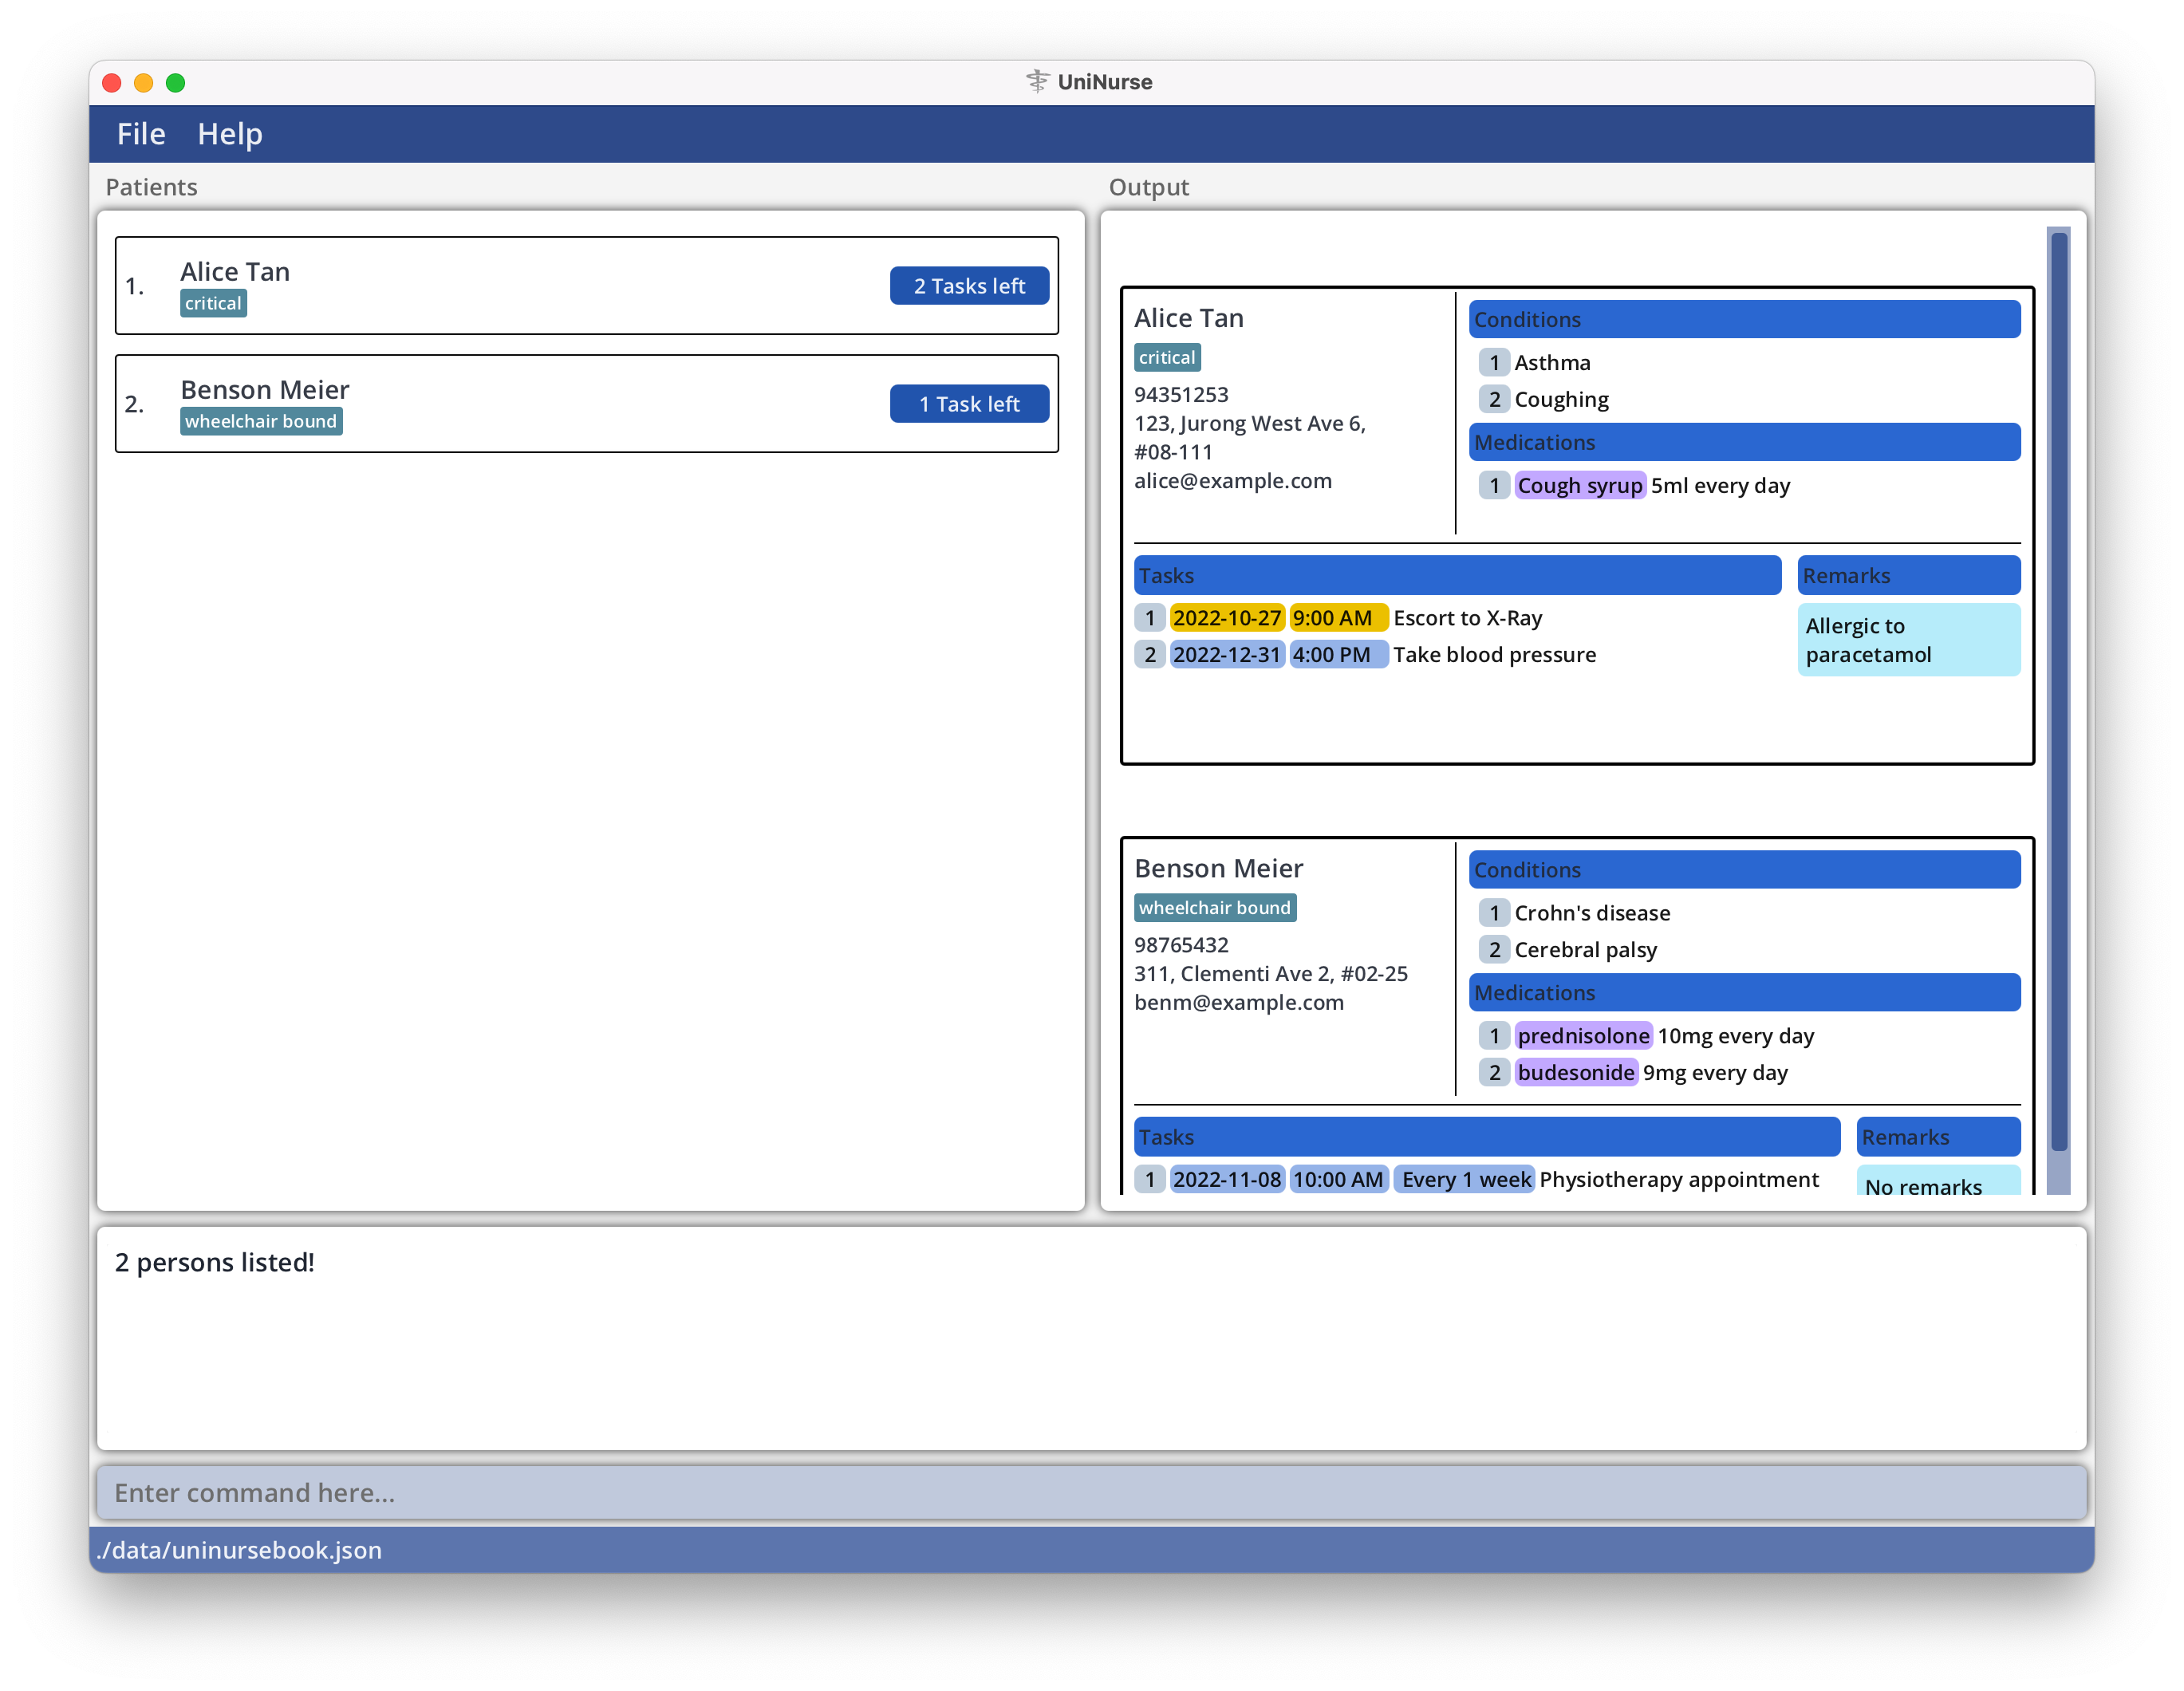
find alice meier command
Viewing all tasks for a particular day: view
You can view the list of tasks for a particular day using the view command.
Format: view DATE
![]() Note:
Note:
The DATE must be of the specified format DD-MM-YY
Examples:
-
view 5-9-22lists the tasks on 5th September 2022 -
view 25-11-22lists the tasks on 25th November 2022
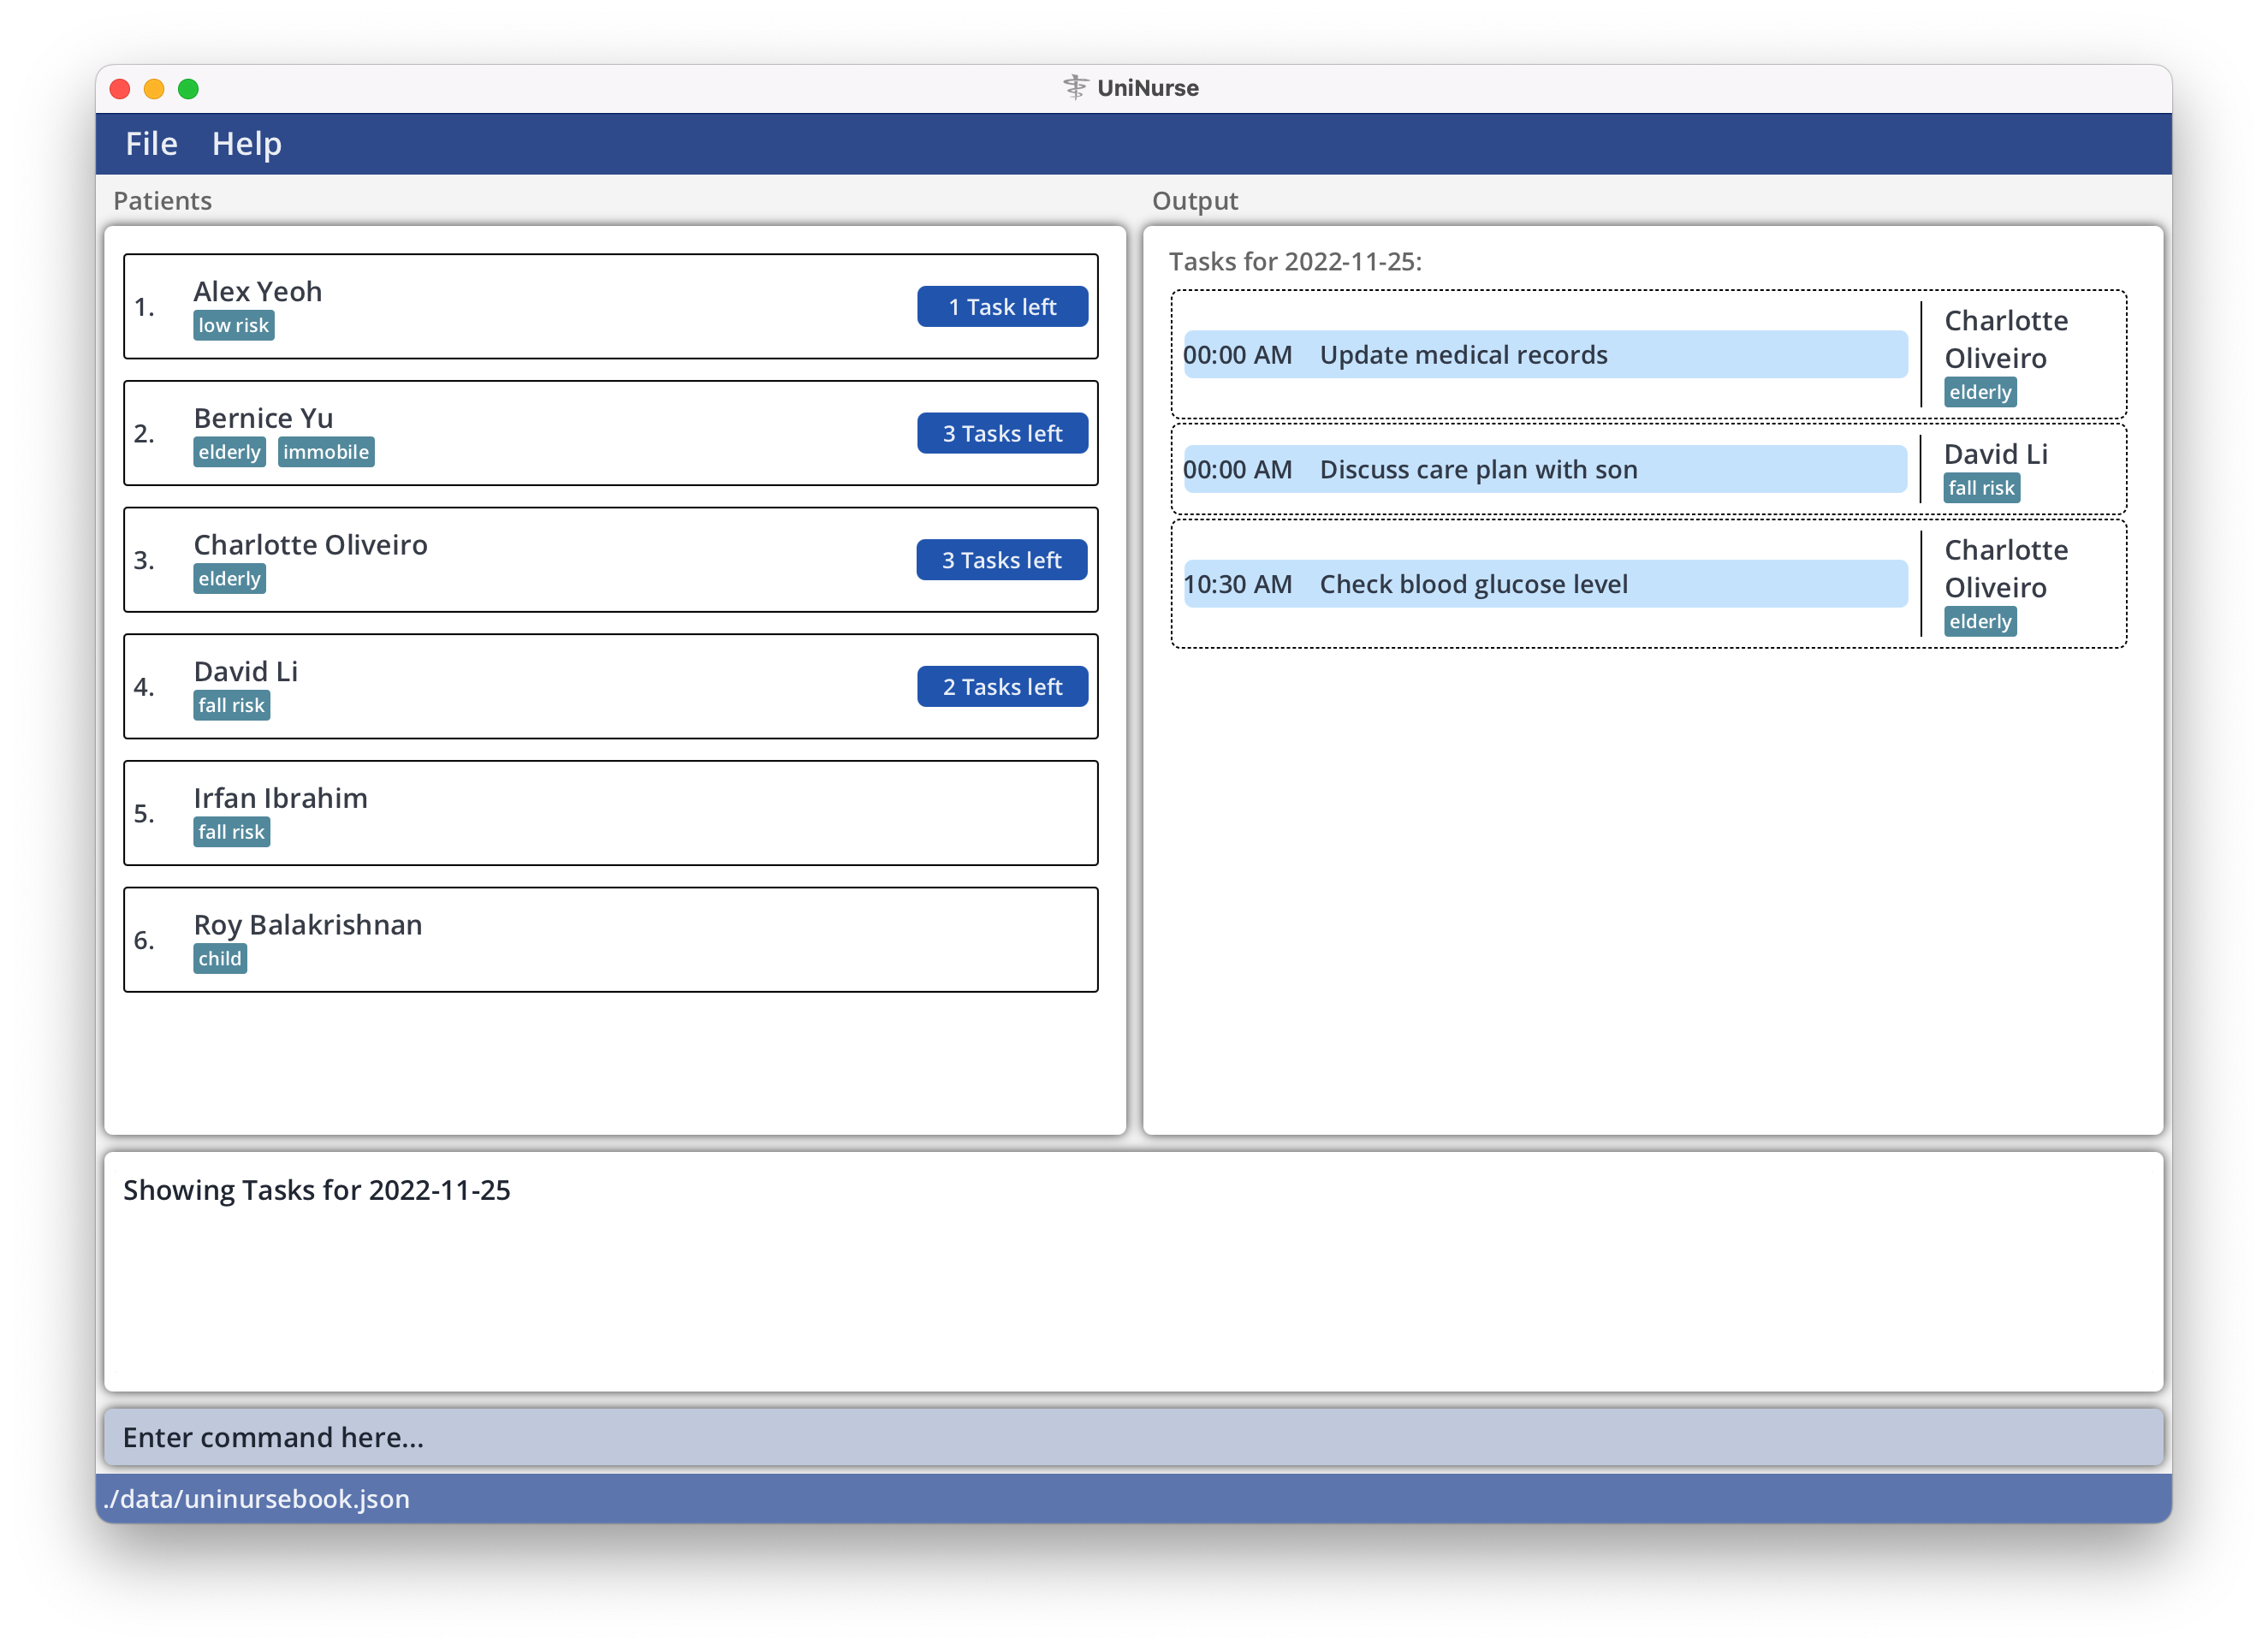
view 25-11-22 command
Viewing all tasks for today: view --today
You can view the list of tasks that are due today using the view command with the special flag --today.
Format: view --today
Examples:
Let’s say you added the following patients and their tasks:
- Physiotherapy appointment for Alex Yeoh at 12:00pm on 2022-11-04
- Administer insulin dose for Charlotte Oliveiro at 11:45am on 2022-11-04
If today’s date is 2022-11-04, view --today will display those 2 tasks.
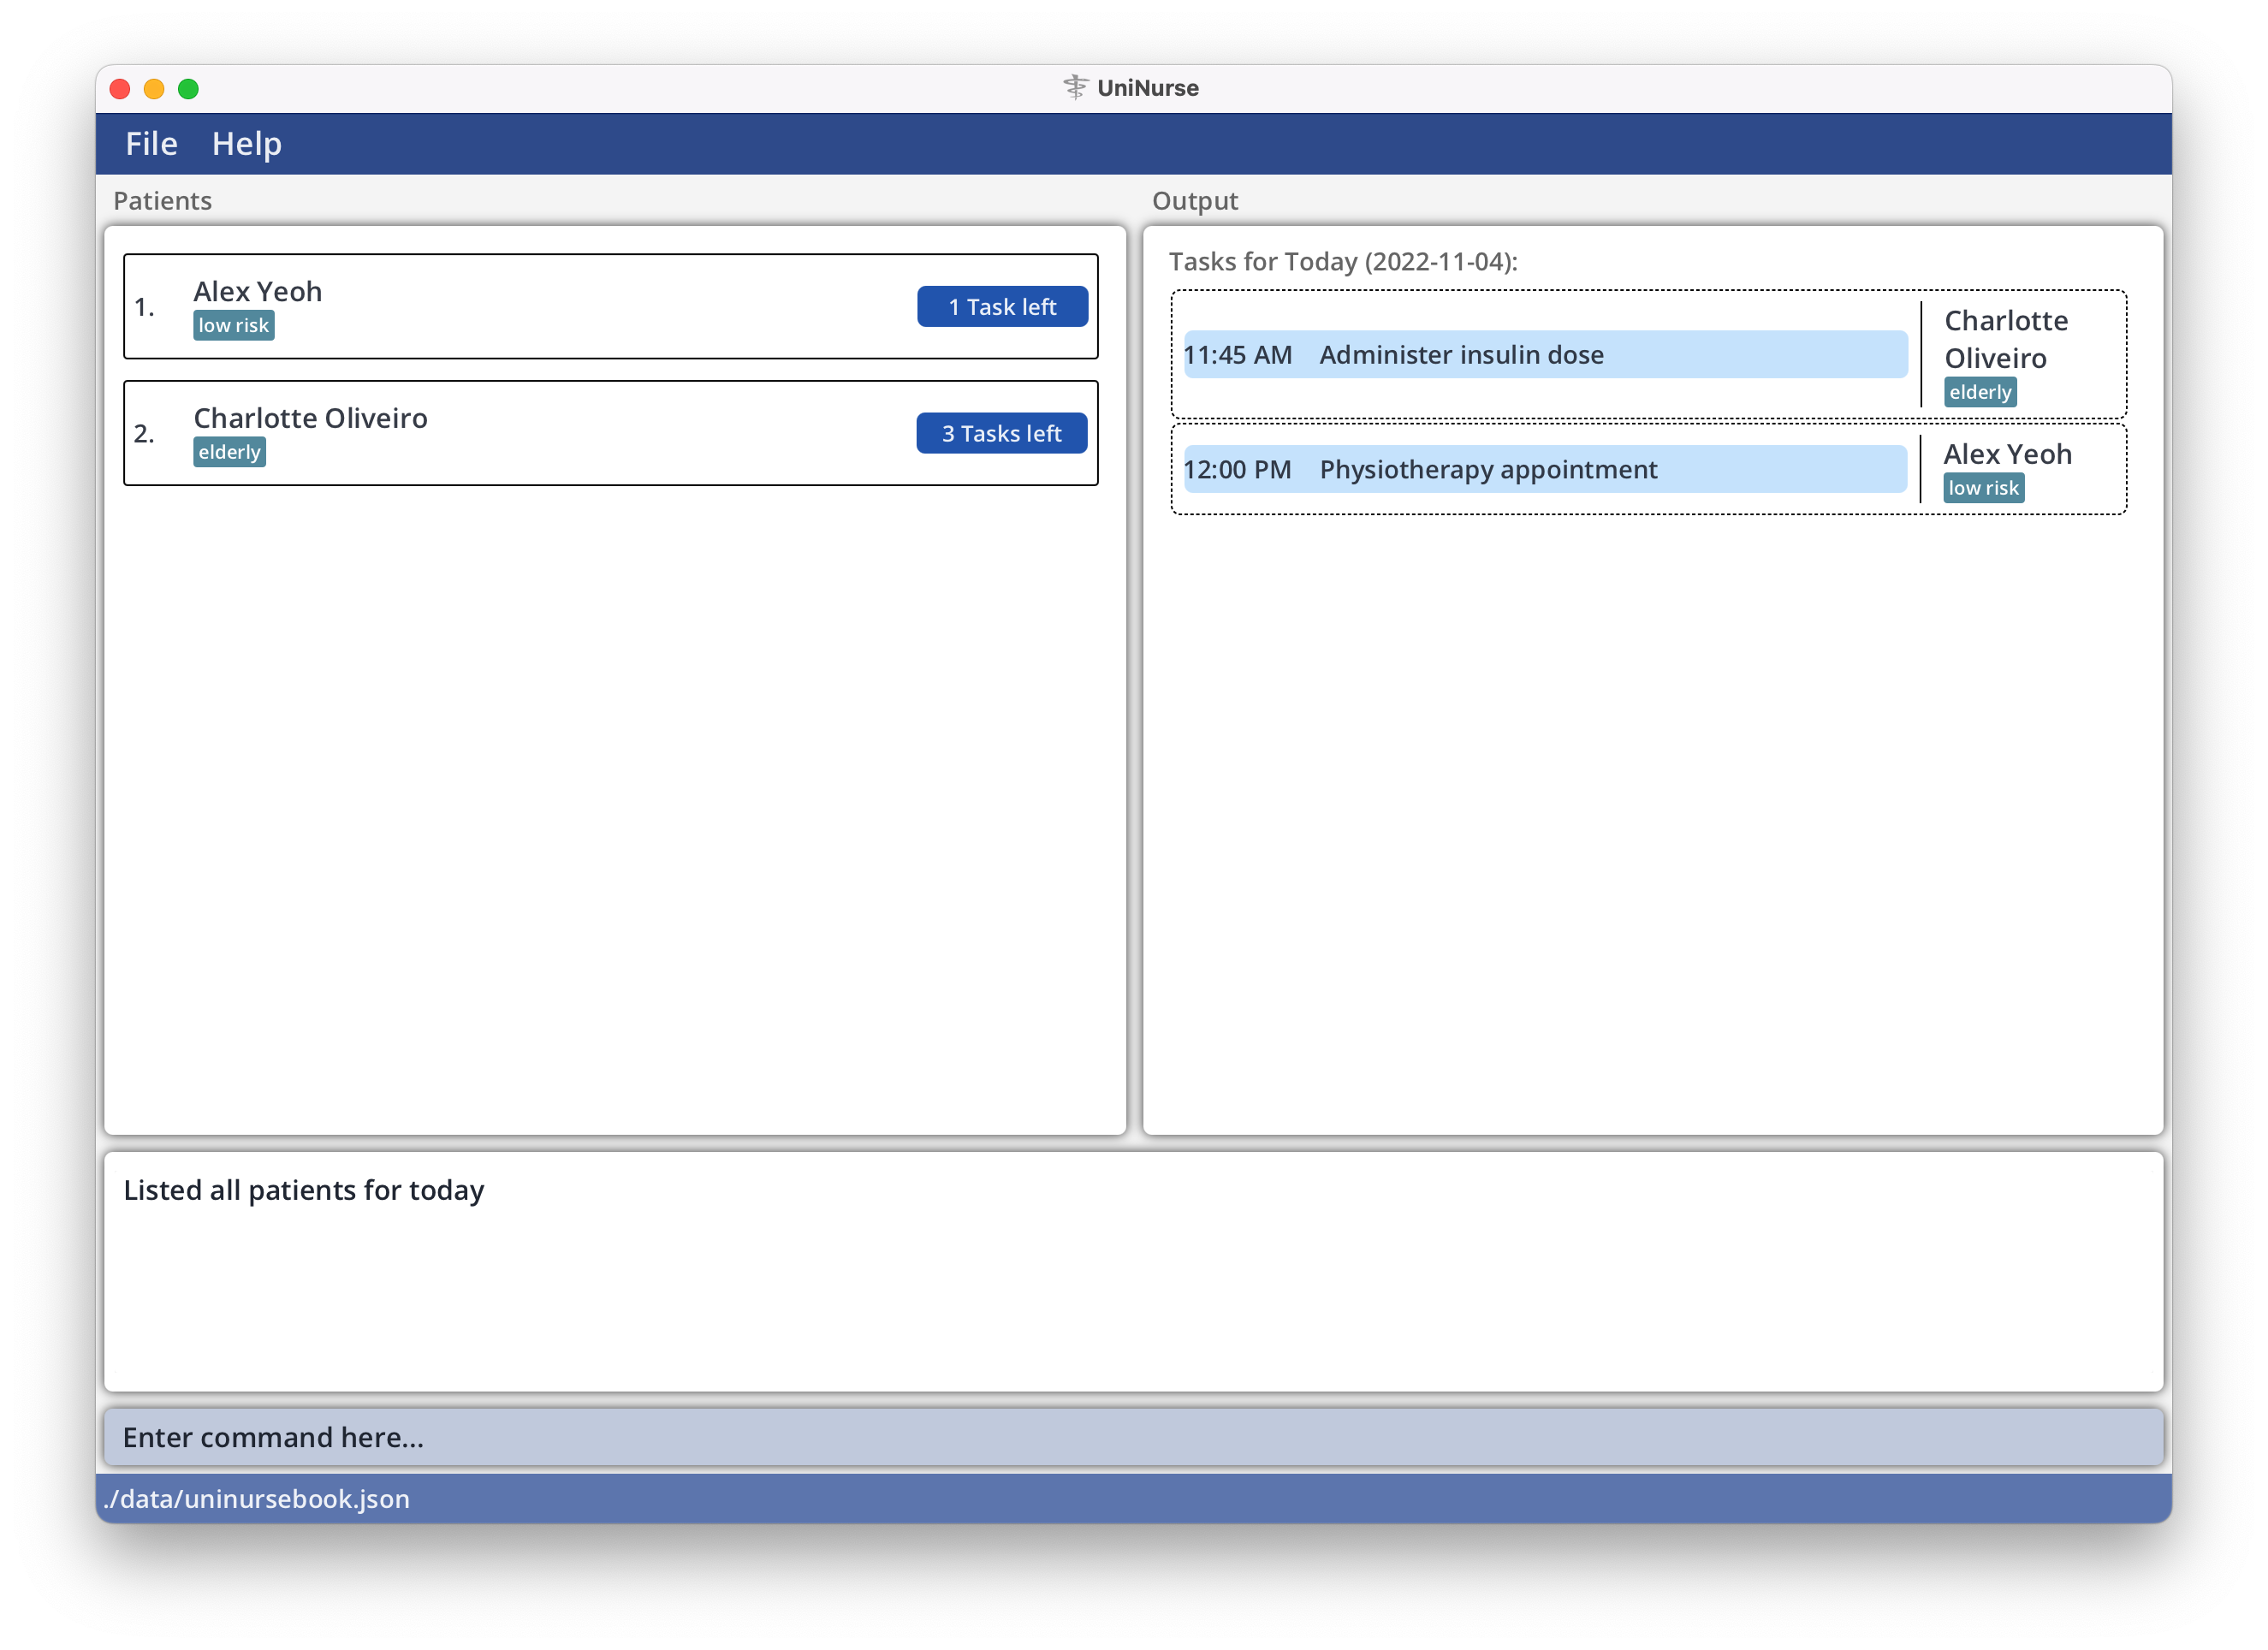
view --today command
![]() Tip:
Tip:
This command replaces DATE in the previous command with the special flag --today.
Viewing all tasks of a patient: view -p
You can view the list of tasks for a particular patient using the view command.
Format: view -p PATIENT_INDEX
Examples:
-
listfollowed byview -p 2will show the list of tasks for the 2nd patient in the patient list.
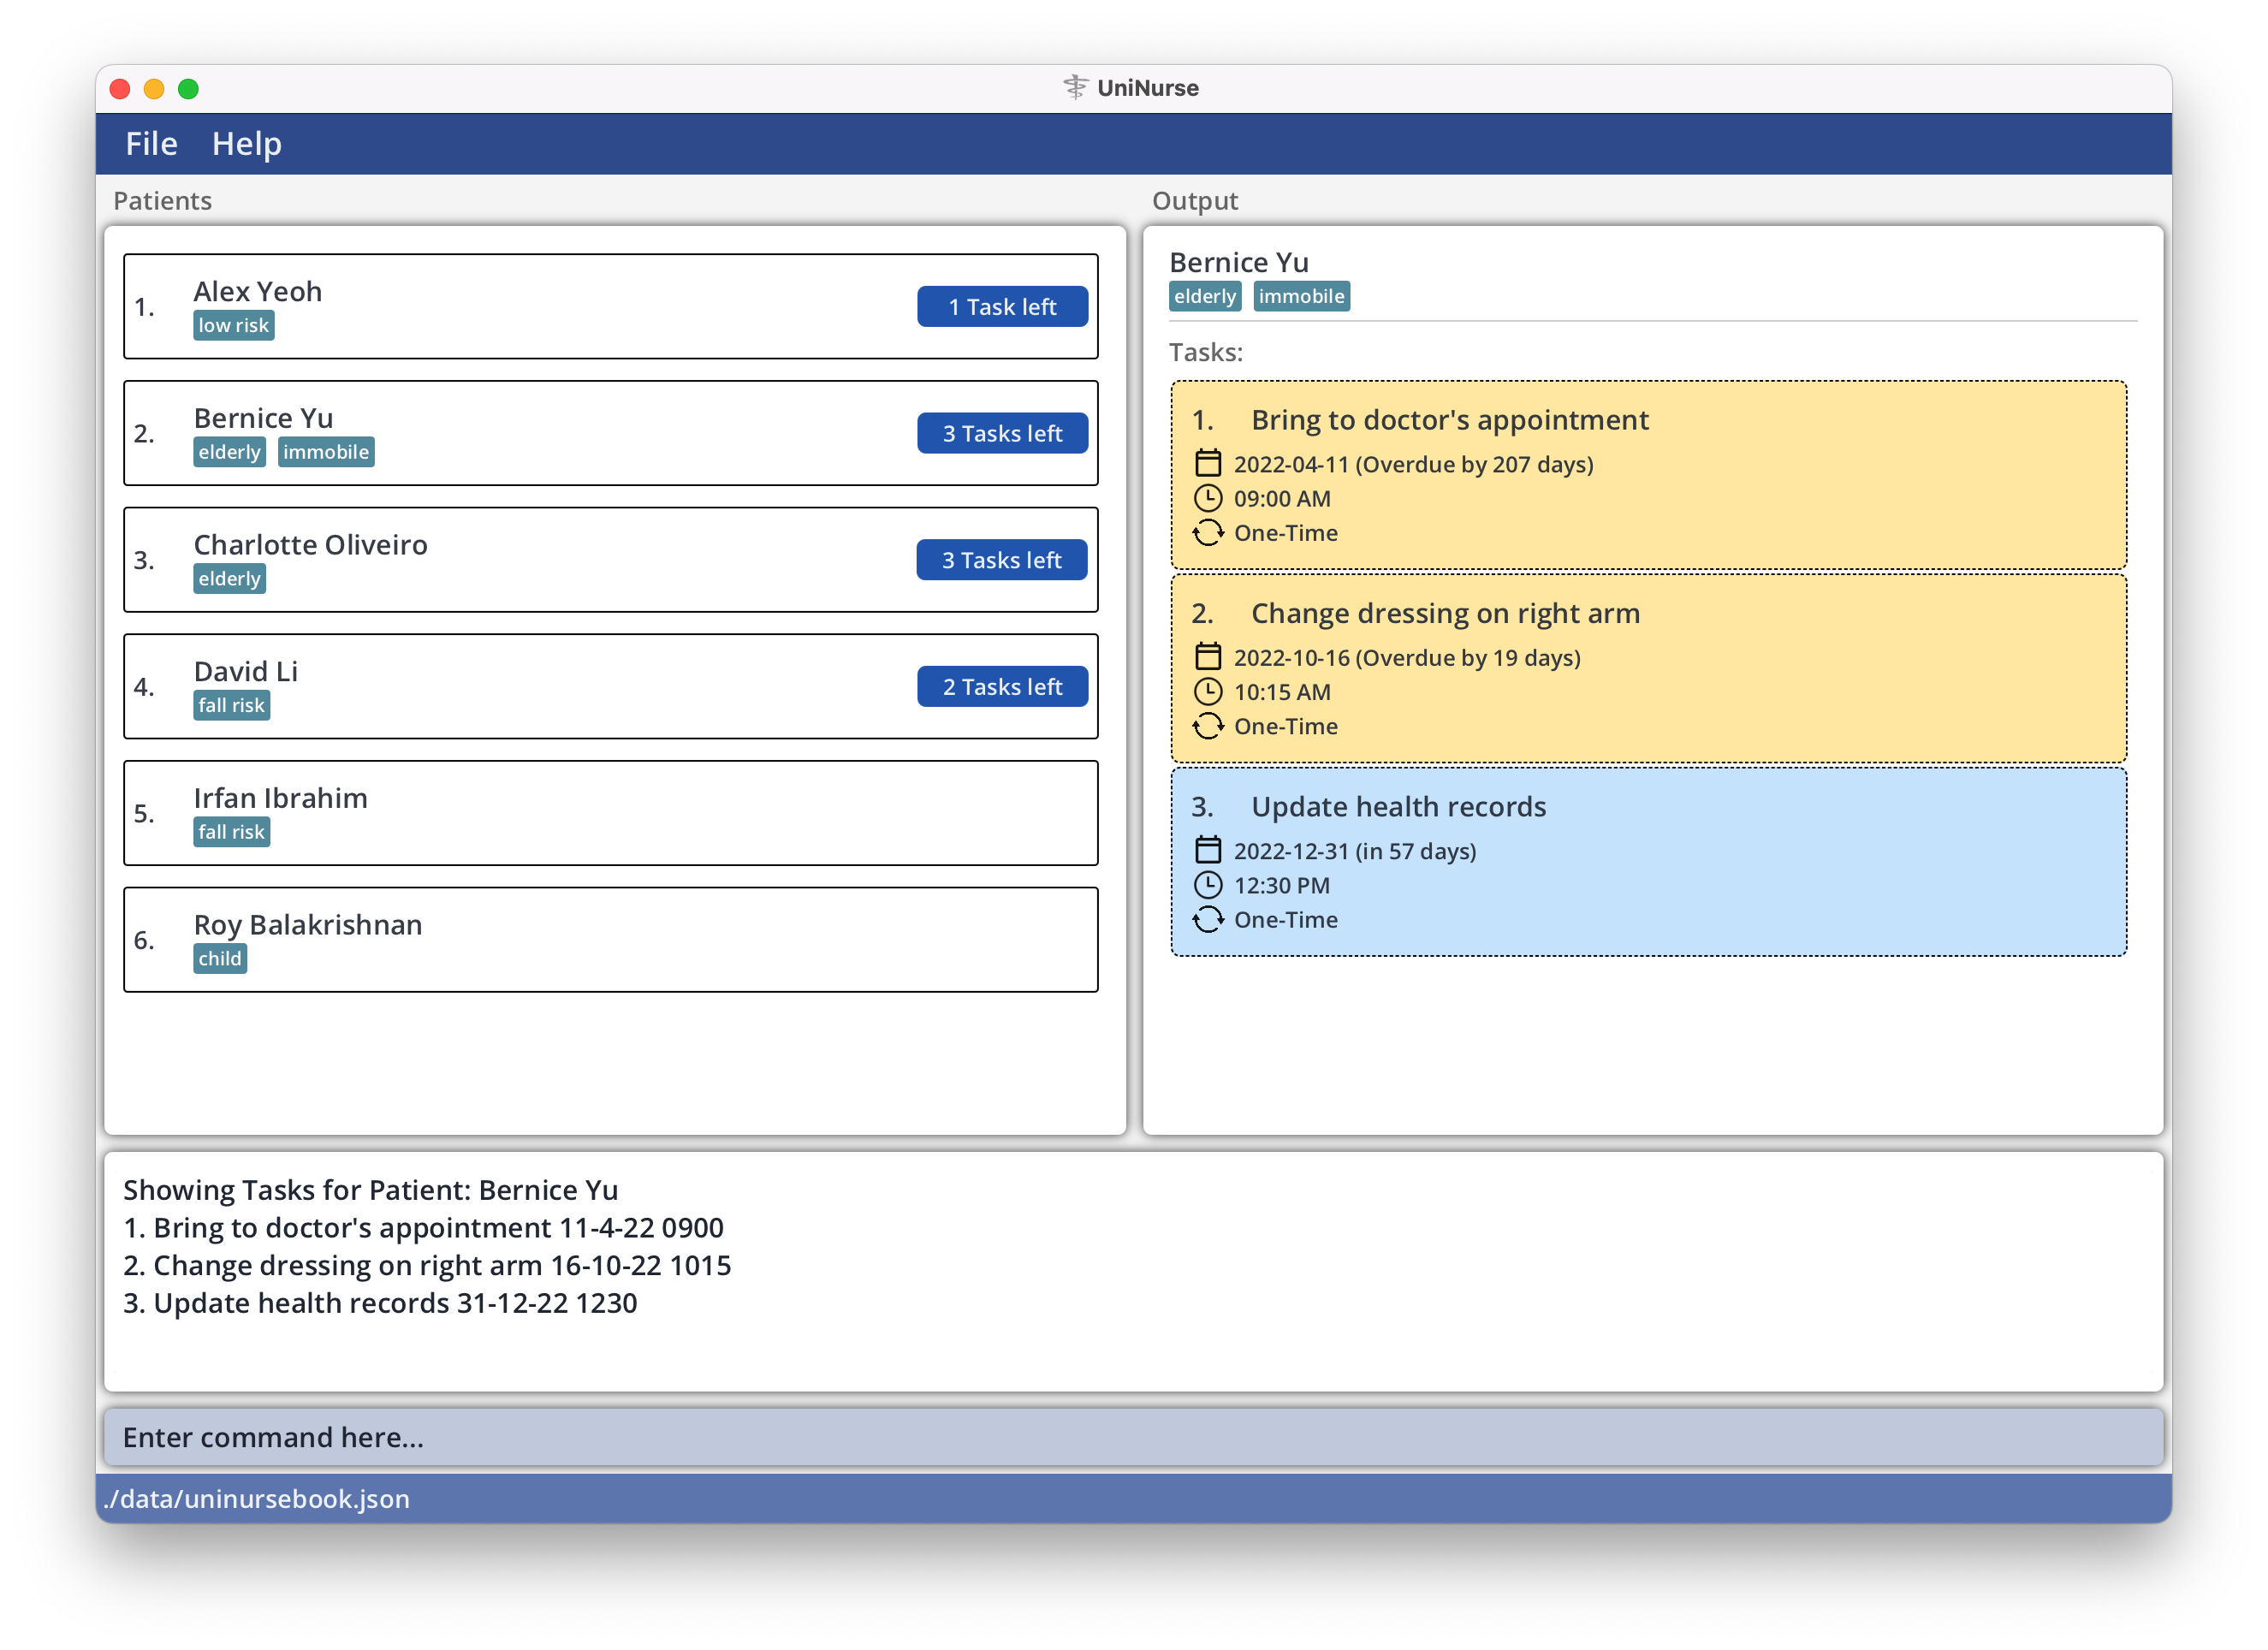
view -p 2 command
Viewing all tasks of all patients: view -p --all
You can view the list of tasks for all patients using the view command with the special flag --all.
Format: view -p --all
Examples:
-
view -p --allwill show a list of all tasks belonging to patients with tasks.
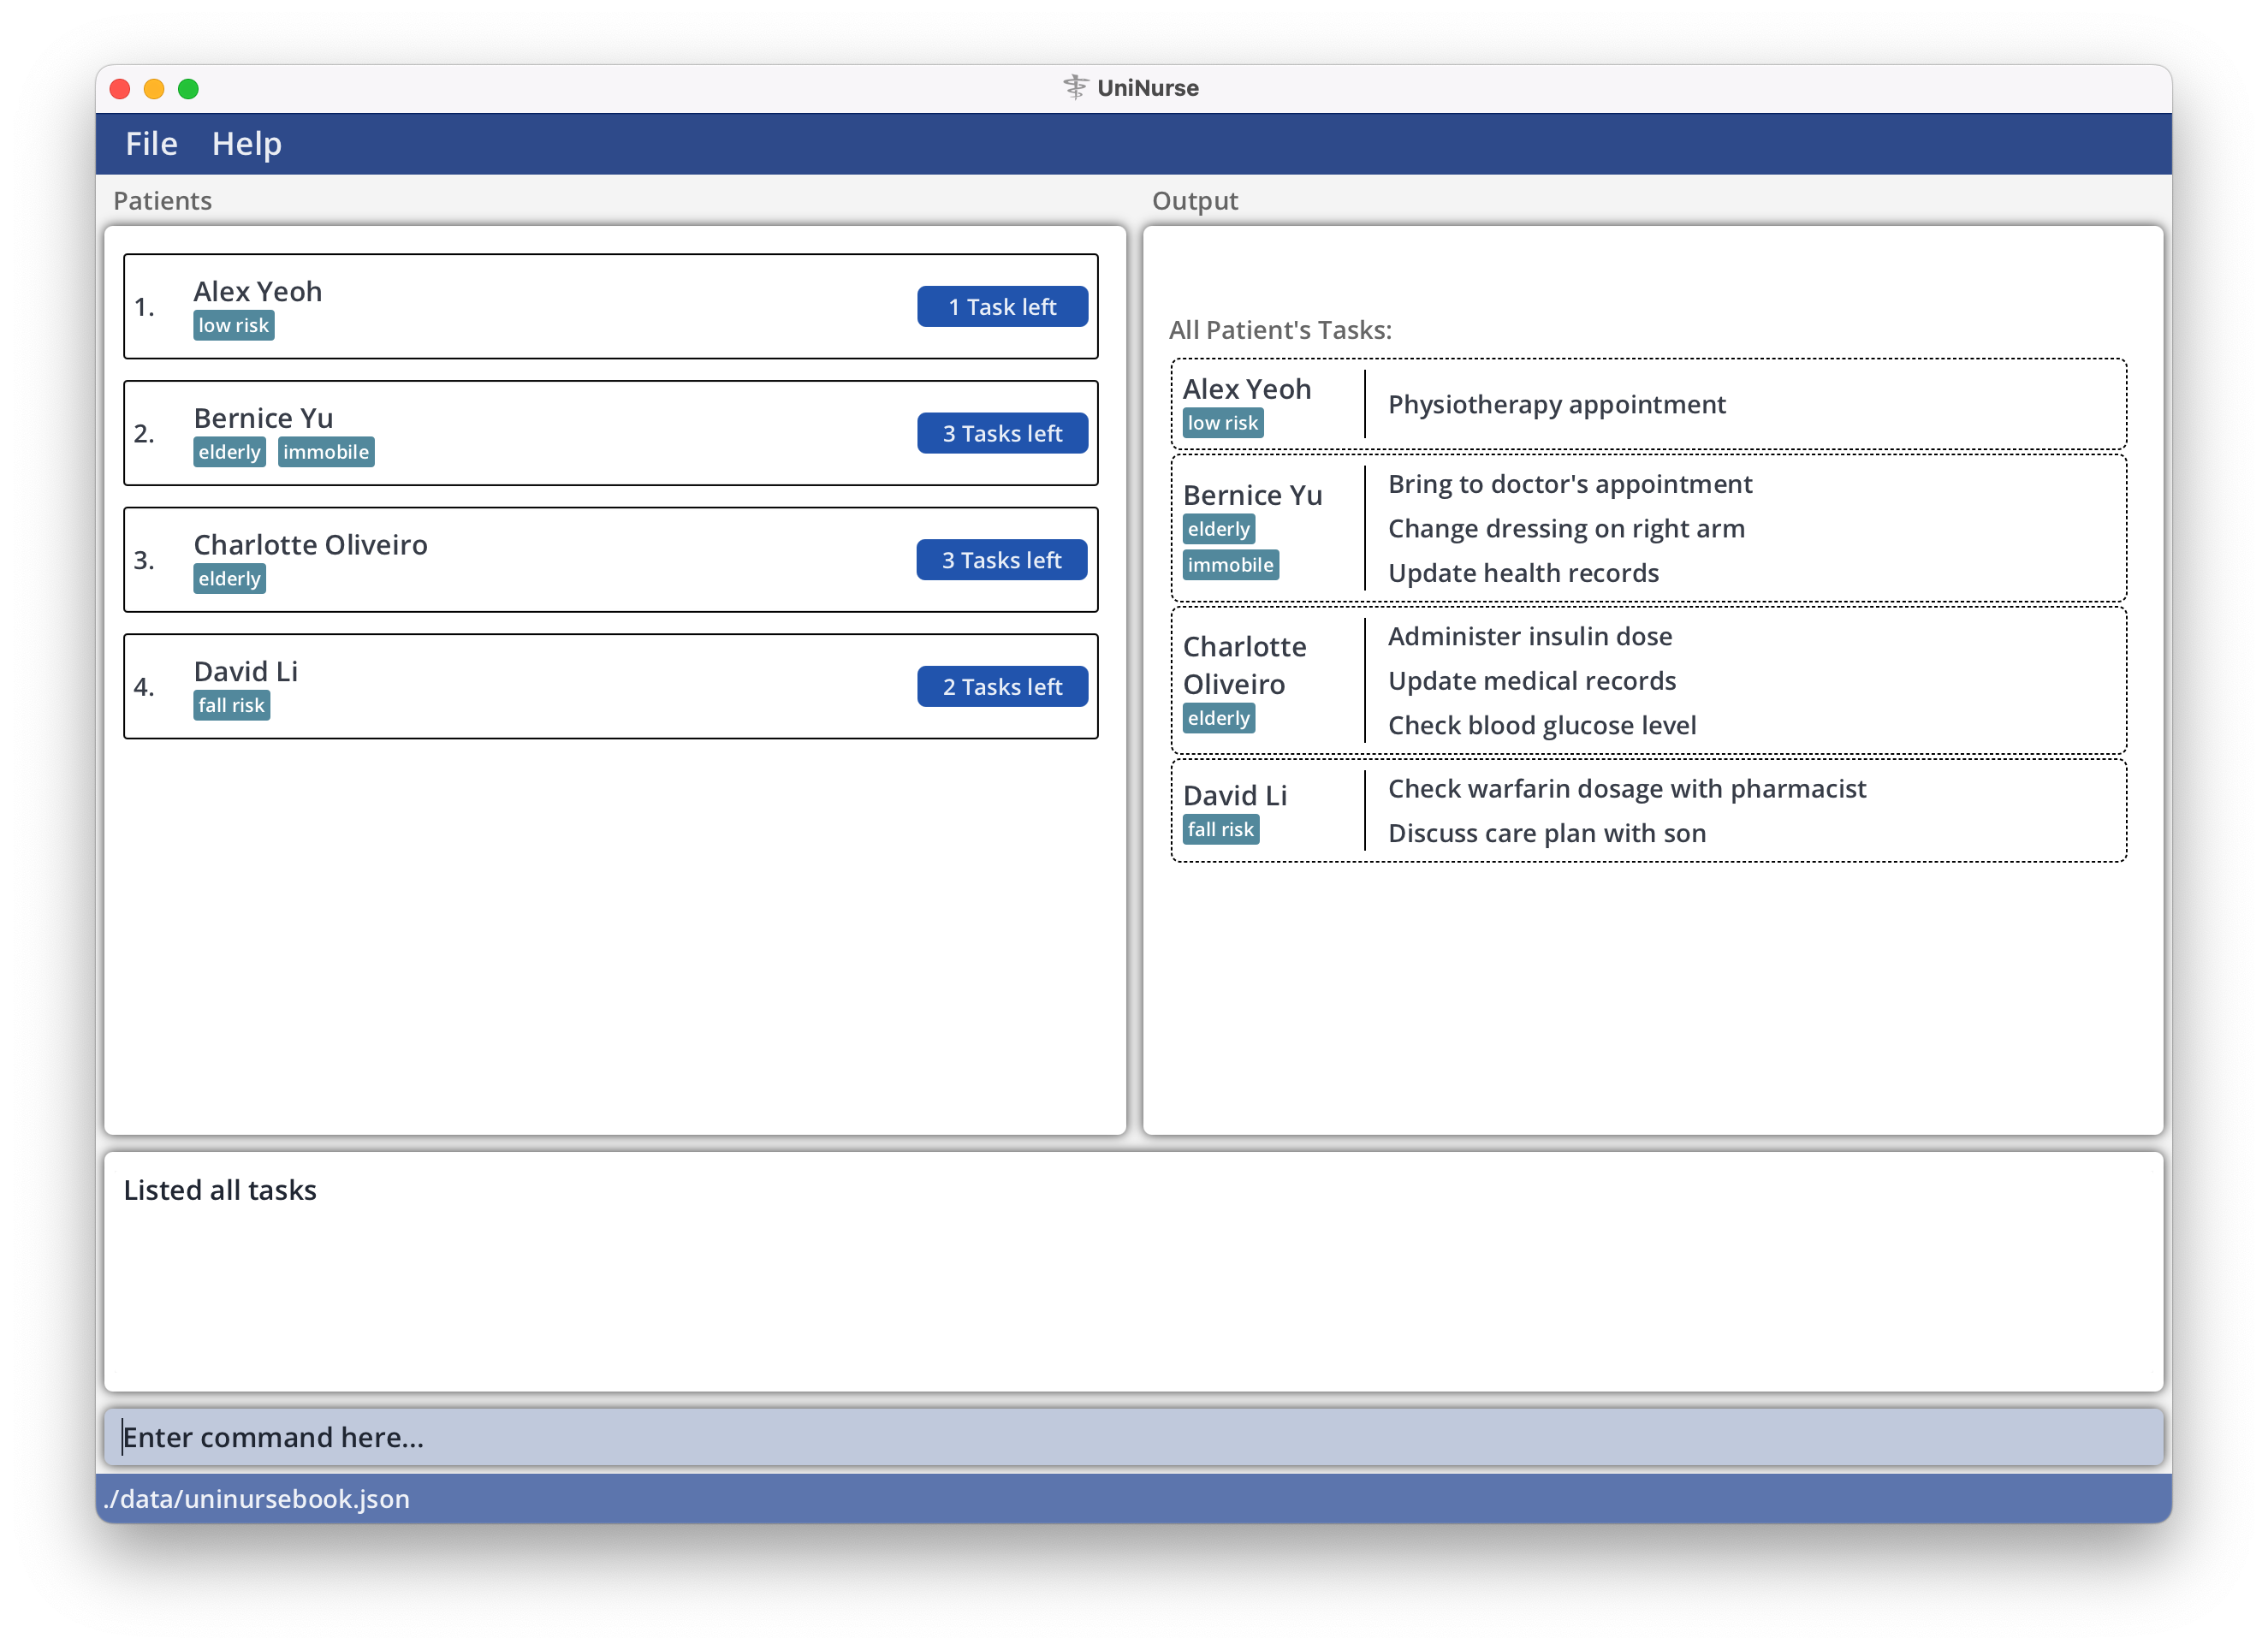
view -p --all command
![]() Tip:
Tip:
This command replaces PATIENT_INDEX in the previous command with the special flag
--all.
Undoing previous command: undo
You can undo the last command which modifies the application data with the undo command.
Format: undo
![]() Note:
Note:
Commands which modify the application data are the add, edit, delete, and clear commands.
Examples:
-
delete -p 2followed byundohas the same effect as not doing thedeletecommand. -
delete -p 2followed bylist, then followed byundowill undo thedeletecommand.
Reversing undo command: redo
You can undo the last undo command with the redo command.
Format: redo
Example:
-
undofollowed byredohas the same effect as not using theundocommand. - Two consecutive
undocommands followed byredohas the same effect as using theundocommand once.
Clearing all entries: clear
You can clear all patient entries in the displayed patient list with the clear command.
Format: clear
Examples:
-
listfollowed byclearwill delete all patients. -
find Betsyfollowed bycleardeletes all patients in the results of thefind Betsycommand.
![]() Tip:
Tip:
You can use the undo command to undo an accidental clear command.
Exiting UniNurse: exit
You can exit UniNurse with the exit command.
Format: exit
Saving the data
UniNurse automatically saves its data on the hard disk after any command that changes the data. You do not need to save manually.
Editing the data file
UniNurse data are saved as a JSON file [JAR file location]/data/uninurse.json.
If you are an advanced user, feel free to update data directly by editing that data file.
FAQ
Q: How do I transfer my data to another computer?
A: Install the app on the other computer and overwrite the empty data file it creates with the file that contains
the data of your previous UniNurse home folder.
Command summary
| Action | Format |
|---|---|
| Help | help |
| Add patient | add n/NAME p/PHONE_NUMBER e/EMAIL a/ADDRESS [t/TAG]… [d/TASK]… [c/CONDITION]… [m/MEDICATION]… [r/REMARK]… |
| Edit patient | edit -p PATIENT_INDEX [n/NAME] [p/PHONE_NUMBER] [e/EMAIL] [a/ADDRESS] |
| Delete patient | delete -p PATIENT_INDEX |
| Add tag | add -p PATIENT_INDEX t/TAG |
| Edit tag | edit -p PATIENT_INDEX -t TAG_INDEX t/TAG |
| Delete tag | delete -p PATIENT_INDEX -t TAG_INDEX |
| Add task | add -p PATIENT_INDEX d/TASK |
| Edit task | edit -p PATIENT_INDEX -d TASK_INDEX d/TASK |
| Delete task | delete -p PATIENT_INDEX -d TASK_INDEX |
| Add condition | add -p PATIENT_INDEX c/CONDITION |
| Edit condition | edit -p PATIENT_INDEX -c CONDITION_INDEX c/CONDITION |
| Delete condition | delete -p PATIENT_INDEX -c CONDITION_INDEX |
| Add medication | add -p PATIENT_INDEX m/MEDICATION |
| Edit medication | edit -p PATIENT_INDEX -m MEDICATION_INDEX m/MEDICATION |
| Delete medication | delete -p PATIENT_INDEX -m MEDICATION_INDEX |
| Add remark | add -p PATIENT_INDEX r/REMARK |
| Edit remark | edit -p PATIENT_INDEX -r REMARK_INDEX r/REMARK |
| Delete remark | delete -p PATIENT_INDEX -r REMARK_INDEX |
| List all patients | list |
| View all details of a patient | focus -p PATIENT_INDEX |
| Find patients | find [KEYWORD]… [xyz/XYZ_KEYWORD]… |
| View all tasks for a particular day | view DATE |
| View all tasks for today | view --today |
| View all tasks of a patient | view -p PATIENT_INDEX |
| View all tasks of all patients | view -p --all |
| Undo previous command | undo |
| Reverse undo command | redo |
| Clear all entries | clear |
| Exit | exit |